Sunday, December 26, 2010

Gavreel

Here is a glimpse of the next new model from Psalmos.  Introducing the Gavreel, shark fin V design with Hardtail bridge.  6 in line headstock and 24 inch playing scale.  I realize at this point that what I described isn't exactly what is pictrured below.  Sometimes, guitar projects take on a life of their own.
This one is a build for my youngest son, Caleb.  He's VERY anxious to arrive at a final product.

Getting started, here we are clamping the pieces together.  A special thanks to my Dad for giving me the pipe and furniture clamps!  A special note, the furniture clamps came from my grandfather who used to reupholster antique furniture.  These clamps have got to be close to 100 years old!  BEST clamps I've EVER used!
Here I've added the left wing.  Again, I clamped the HECK out of it, therefore it's a very tight glue joint.  You can NEVER have too many clamps.
Here we have the next wing added and, of course, this is Caleb.  He wanted to add the 6 inline headstock because it was more 'pointy', like the guitar body.  Kids use strange words, don't they?
Ready for the jigsaw.
 He can't stand it, he's got to rock out before it's even got strings!  He actually DOES have eyes, he's just smiling too broadly...:).
Here we have a shot of the raised hardtail bridge.  No tremolos this time!
The fingerboard is constructed of Red Oak and Abalone inlays are inserted and sanded flat to the surface.

Here is a shot of the truss rod installed.  This one is a 1/4" rod and long nut, VERY beefy!  A note here, everything you see pictured, constructionwise, was purchased from Home Depot.  Do you think they will give me a spot on their next commercial?
I tested the placement of the bridge and neck and it looks like we are spot on!
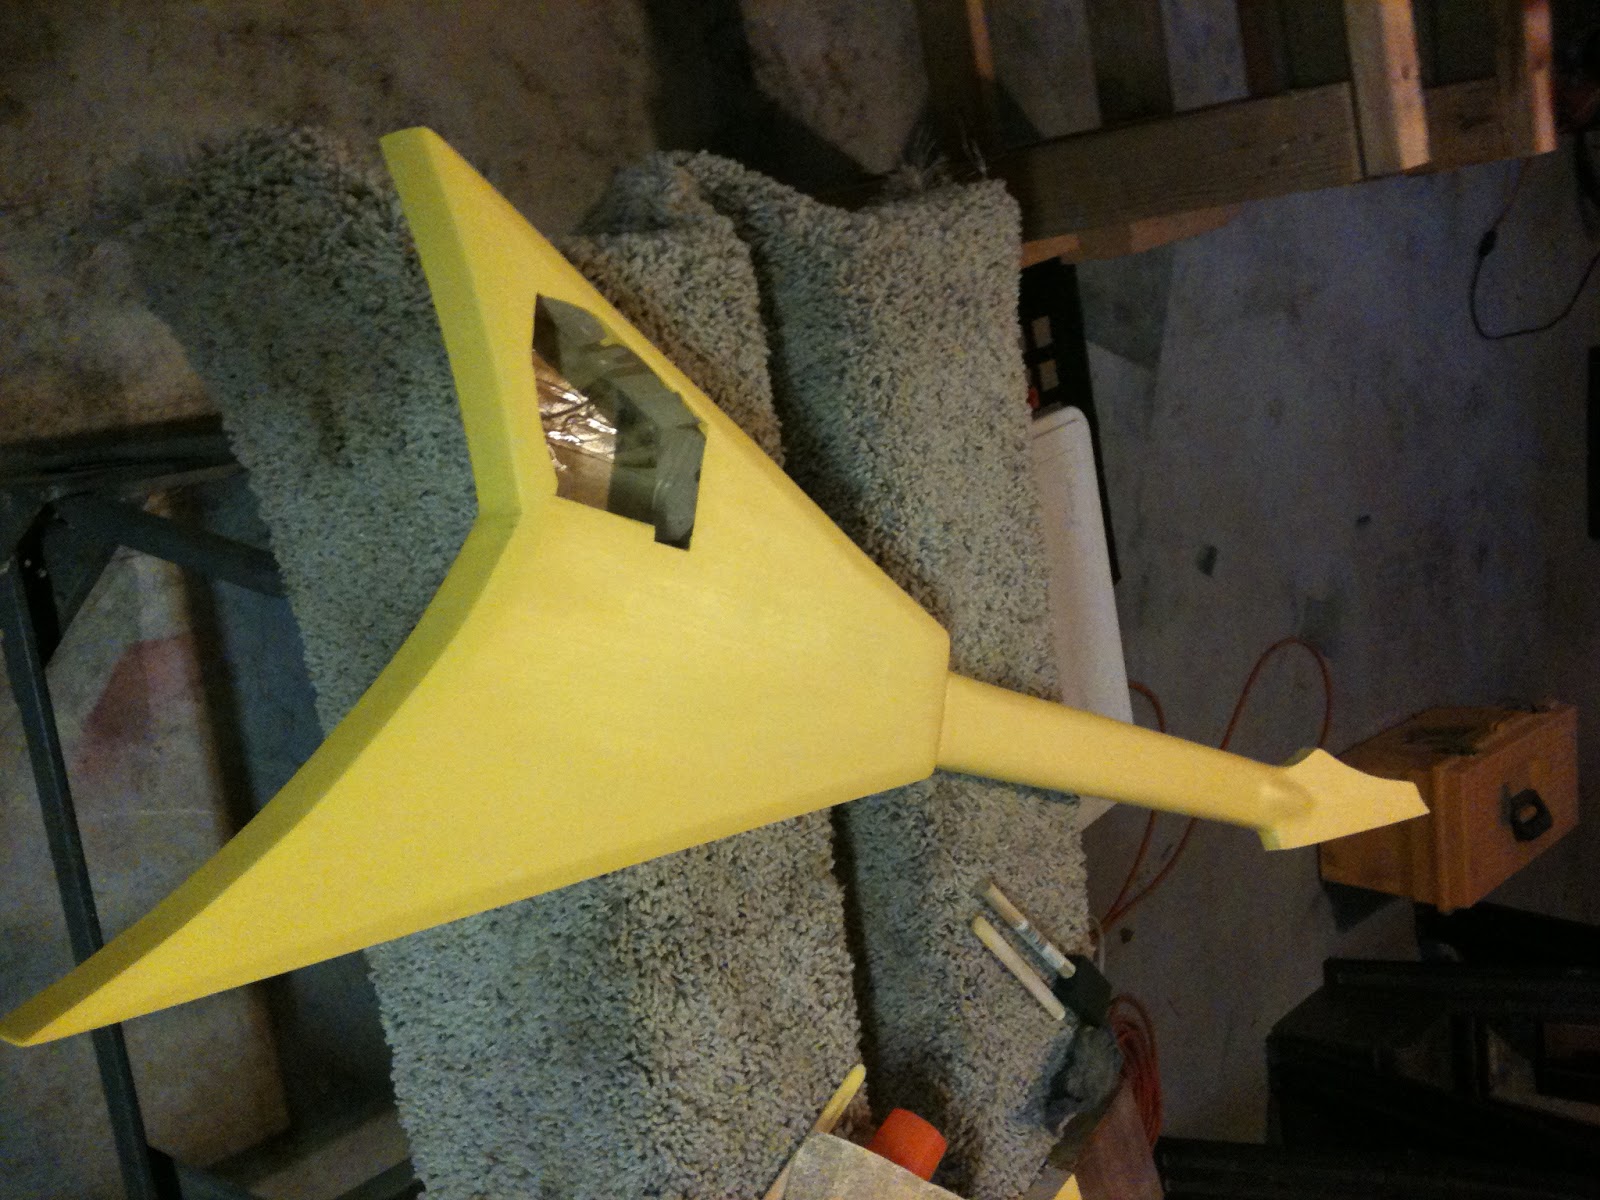
Now we have added a splash of color.
The white spots are to cover up the dark areas of the Poplar that keep bleeding back through.  After all is said and done, we will have 8 coats of acrylic paint.
...And now we have GRAPHICS!!!
I wish I could have taken a picture of Caleb's face when I told him I dropped his guitar and broke it!
Logo added
...and here we have the 'donor' guitar.  It's a Peavey Rockmaster.  I tested the pickup and all electronics and they work very well, only the jack crackles a little.  That will be taken care of when I transplant the electronics.
...And here we are, after 2 years, finally finished!  Here's the stats:  Hardtail bridge with accompanying aluminum nut.  A single humbucker pickup at the bridge location.  Schaller style keys that have been very good with keeping the D'Addario strings tuned.  This will be the standard that I will follow with all subsequent guitars.
A close up of the finished product.  This guitar is very solidly built and totally SCREAMS!!
Thanks for sticking with the build and God Bless!


Monday, November 29, 2010

FAQ's

Here are some commonly asked questions:

1.)  What does Psalmos charge to build a custom electric guitar?  The base charge for a custom solid body guitar (which includes purchase of all hardware and electronics) is $1,000.00 (Google custom solid body guitars and compare our prices to theirs!).  However, the prices go up the more complex a guitar becomes.  Of course, I'm always willing to negotiate if you are wanting to contribute a donor guitar...:).

2.)  What is a 'donor' guitar?  This is a guitar that clients have donated for me to pirate the parts from to complete a custom solid body for them.  Basically, if you give a donor guitar, you'll get that one back except we will build the body and neck w/fretboard custom.  This seems to be the more popular option.

3.)  What determines the complexity of an instrument?  It's all in the wood selection and finishing.  If you want to go with a rare wood, such as Bubinga, it's definitely going to cost more because of limited supply.  Also, if you decide you want a really complex graphic design, although we are capable, it would take a lot more time to complete and therefore would raise the price.

4.)  How long does it take to build a Custom Solid Body Electric Guitar?  The base time I like to give is 14 weeks from start to finish.  The process is not one that can be hurried because of the level of quality that Psalmos is accustomed to delivering.

5.)  How are Psalmos' Guitars designed?  I design each body style personally utilizing AutoCAD as a drafting aid.

6.)  What materials do you use to build the guitars with?  I mostly use wood that has been thrown out for whatever reason, so it can vary.  This is what makes Psalmos' products unique.  Woods I have used include Pine, Poplar, Maple, Birch, Ash and Oak.  All fingerboards are made from very dense hardwoods such as Oak or Maple.

7.)  What is the common scale for Psalmos Custom Electric Guitars?  At this point, we are using 24 scale.

8.)  I want to learn to play the guitar, but I'm not sure what kind I should have custom built?  First of all, if you are a beginner, I strongly suggest you not get a custom guitar built.  Sure, I would love the business, but, you will have no idea as to what you need or want until you have been playing for awhile.  I also suggest that you get a cheap guitar to practice on from a relative or even a place like craigslist.  Find out if you actually LIKE playing before you spend the bucks for a custom guitar.

Tuesday, November 23, 2010

Template Construction

In this section I want to explain how I create templates to use to build solid body electric guitars.  Hopefully, this will encourage you to create your own designs.
I first start my design on AutoCAD and make a 1" gridwork in the computer.
I use Card Stock to create a hard copy template.  In this case I'll use 4 sheets.
Tape the sheets down to a table or some flat surface and layout the grid lines that I drew in AutoCAD.  I use a straight edge and add the lines and number them accordingly.
I then place dots on the physical grid board in conjunction with what is on the computer and use french curves to connect the dots.  At this point, it's important to mention the reason why I do this instead of printing it out from the computer.  One, I don't have a printer that large and two, each time you print something from the computer you run the risk of the program or printer, or both, scaling the drawing, thus creating an inaccurate template.  To some, that may not matter, but to me, it makes ALL the difference!
Putting on the final touches.
The completed sketch!  100% scaled accurate.
Now, I use an x-acto blade to cut out the template.
I remove the cutout template and set it aside until I am ready to apply it to a new creation...

Saturday, November 20, 2010

The Warrior

This is the second design for Psalmos, created in 2009.  Following will be the procedure I used to come up with this design.  Hopefully, you can glean some inspiration for your own designs?
First, I start with a template that I designed using AutoCAD 2006.
I traced the template on 1 1/2" thickness birch plywood and cut it out with a jigsaw as a bandsaw can be unpredictable at this thickness.
After some shaping with a router and a belt sander, I use another template to locate the humbucker pickups.
Since this body was created from plywood, the edges had to be shaped with a sander and then spot filler added around the perimeter.  This fills in all the pores left from the roughness of the plywood.  Afterward, the body gets a final sanding.
...and now, pickup cavities and neck pocket is routed and primer is added in three coats.  Before final painting, the body is wet sanded using 400 grit sandpaper.
Now we have final paint and graphics...the next step will be to add about 5 coats of laquer...stay tuned!

Sunday, November 14, 2010

Guitar Repair 101

Picture this; you've completed your latest masterpiece and are sooo proud...

...and then, the unthinkable happens...
The shelf unit in the Master Bedroom collapses and smashes down on top of the Defender.  The little red spots are where I repaired the chunks that were taken out by the faulty shelf unit.
First, I mask off the area to be repaired.  Fortunately for me, I did not mix custom colors and therefore do not have to match.  I always try to use Krylon paints because they dry fast and can be lightly sanded if necessary an hour after spraying.
Excess tape is removed with an x-acto knife.
All areas not to receive paint are masked and cloth is taped to them.
Spraying about 3 light coats and sanding with 1500 grit in between coats.

...and now, all tape is removed to reveal a complete restoration.  The only thing left (besides the electronics) is to put on about 5 coats of laquer.
I got new pickups some time ago from a guy who was parting out his old Les Paul.  The tabs on these pickups required some modifications to the pickup cavities so I used them as a template to mark on the body.
Now that it's marked I'll use a rubber mallet and wood chisels to modify the cavities.  More later...

Tuesday, November 9, 2010

Routerless Guitar Construction

I hate using a router, plain and simple!  I developed a method in which no router has to be used to assemble a solid body electric guitar.  I'm fairly certain I am not the one to pioneer this method.  I put it together in Google Sketchup and made jpeg images of the process.  I'll update this post as I create new jpegs...enjoy!
This first jpeg is of how I cut out the shapes, two from 1.5" thickness wood (your choice) and one from .25" thickness wood for the Truss Rod channel.
These pieces are then glued together and clamped.
After I plane the wing to 1.25" thickness, I cut out the shape on the band saw and add this right wing onto the existing configuration.  Note: I found it very beneficial to clamp the uncut board first, then use a jigsaw to cut the final shape.
The left wing added in the same fashion and the little illegible text says to use a wood chisel to create this channel for humbucker wiring installation.

I used neck and headstock templates created on CAD and cut this shape out using a jigsaw.
This view is of the home made truss rod installed and the text proclaims that the part at the headstock will need to be chiseled to fit the nut.
This view depicts the addition of the top of the guitar using .25" material (again, your choice).  All of the cut outs are just that, cut out and not routered (is that even a word?).
This is a shot of the fingerboard installed.  More, later...